Tuesday, June 7, 2011

Final Game + Other Things

A few hours late with this, but I wanted to add some things that I felt would improve it! I still need to update my blog with a couple other assignments from the class, which I will do very shortly.

My final game was constructed in a different fashion compared to most people's projects. Rather than use a separate ActionScript file, I did all of my ActionScript coding within each frame that required it. The code most definitely isn't as complex as what many have written, but when I discovered this method I thought it might be fun to see what I could come up with. The main benefit was that the player can go through various menus and pages without complex ActionScrip. The limitation is in complexity of gameplay.


The title of my game is called "MAZE!" and it's exactly that... two Maze levels that the player must navigate through using their mouse cursor without touching the walls. If the player touches the wall, it's game over and Jim Carrey will call the player a "pathetic loser." Once the player completes the first maze, the second one loads automatically. If the player makes it to the end of the second maze, Jim Carrey is much less mean but equally excited. Neither maze is MovieClip, but rather a button. When the cursor rolls over it, an action is triggered. In this case that action is calling in a new specific frame on the Timeline. A frame is frozen until an input is triggered using the "stop" command. Additionally, I animated a short intro that plays when the player first starts the game. The tune that goes along with it is two notes recorded in Garage Band on my iPad.

Link to Flash file:

https://sites.google.com/a/sou.edu/austin-gurwell-s-sfws/sfw-files/Maze.fla

Here is the ActionScript code broken up by frame:

Frame 1 ("Click..." screen):

stop();
import flash.events.MouseEvent;

firstButton.addEventListener(MouseEvent.CLICK, startIntro)
function startIntro (event:MouseEvent)

{
gotoAndPlay("frame1");
var c = new Jingle();
c.play();
}


Frame 61 (instructions):

stop();
import flash.events.MouseEvent;

startGameBTN.addEventListener(MouseEvent.CLICK, startGame)
function startGame (event:MouseEvent)

{
gotoAndStop("Level 1");
}


Frame 62 (Level 1):

stop();

borderLevel1.addEventListener(MouseEvent.MOUSE_OVER, runOverBorder)

function runOverBorder(event:MouseEvent)
{
gotoAndStop("End Game");
var a = new loser();
a.play();
}
endGame1.addEventListener(MouseEvent.MOUSE_OVER, endLevel1)

function endLevel1(Event:MouseEvent)
{
gotoAndStop("Level 2");
var c = new alrighty();
c.play();
}


Frame 63 (Level 2):

stop();
borderLevel2.addEventListener(MouseEvent.MOUSE_OVER, runOverBorder2)

function runOverBorder2(event:MouseEvent)
{
gotoAndStop("End Game");
var a = new loser();
a.play();
}
endGame2.addEventListener(MouseEvent.MOUSE_OVER, endLevel2)

function endLevel2(Event:MouseEvent)
{
gotoAndStop("Game Won");
var b = new theGame();
b.play();
}


Frame 64 (Winner screen):

stop();
restartBTN2.addEventListener(MouseEvent.CLICK, restartGame2)
function restartGame2 (event:MouseEvent)
{
gotoAndStop("Start");
}


Frame 65 (Loser screen):

stop();
restartBTN.addEventListener(MouseEvent.CLICK, restartGame)
function restartGame (event:MouseEvent)
{
gotoAndStop("Start");
}


Project 5: First Game


package {

import flash.display.MovieClip;
import flash.events.Event;
import flash.ui.Mouse;
import flash.media.Sound;

public class GameTime extends MovieClip {

//Global Variables
var player:MovieClip;
var ball:MovieClip;
var birdsArray:Array = new Array;
var vx:Number=0;
var vy:Number=0;
var maxAngle:Number;
public var speed:int;


public function GameTime()

{
// constructor code

//Make birds
makeBirds();

//Hide the mouse
Mouse.hide();

// Fill variables
player = new Snake;
ball = new Apple;
ball.vx = 5;
ball.vy = 5;
maxAngle = 15;
trace("Les do dis!!!");


//Add stuff to stage
addChild(player);
addChild(ball);

player.x = stage.stageWidth * .5;
player.y = stage.stageHeight * .85;
ball.x = stage.stageWidth * .5;
ball.y = stage.stageHeight * .1;

player.scaleX = .2;
player.scaleY = .2;
ball.scaleX = .15;
ball.scaleY = .15;


//event listeners
addEventListener(Event.ENTER_FRAME, onEnterFrame);

} //end constructor function

//Event Handler and other functions

function makeBirds():void

{
for (var i:int = 1;i>=0;i--){
var tempThing:MovieClip;
tempThing = new Thing();
tempThing.y = Math.floor(Math.random()*stage.stageHeight);
tempThing.x = Math.floor(Math.random()*stage.stageWidth);
tempThing.vx = 3;
tempThing.scaleX = .2;
tempThing.scaleY = .2;
trace("tempThing"+i+"vx = " + tempThing.vx);
trace("tempThing"+i+"vy = " + tempThing.vy);
addChild(tempThing);
birdsArray.push(tempThing);
}
}

function onEnterFrame(event:Event):void
{
{
// move things
moveThings();
moveThing(ball);
player.x = mouseX;
player.y = mouseY;
boundaryBounce(ball);
checkCollision(player, ball);
}

function moveThings():void
{
var tempThing:MovieClip;
for (var i:int = birdsArray.length-1;i>=0;i--){
tempThing = birdsArray[i];
tempThing.x -= tempThing.vx;


}
}

function moveThing(objectA:MovieClip):void
{
objectA.x += objectA.vx;
objectA.y += objectA.vy;
}

function checkCollision(objectA:MovieClip, objectB:MovieClip):void
{
if(objectA.hitTestObject(objectB))
{
objectB.vy = -objectB.vy;
objectB.vx = getCollisionAngle(objectA, objectB);
}
}

function getCollisionAngle(objectA:MovieClip, objectB:MovieClip):Number
{
//returns a new objectB.vy based on where objectB hits objectA
var relativeX:Number = objectA.x - objectB.x;
var relativePercentage:Number = (relativeX/objectA.width)*2;
if (relativePercentage > 1)
{
relativePercentage = 1;
}
if (relativePercentage < -1)
{
relativePercentage = -1;
}
var newVx:Number = -(relativePercentage * maxAngle);
// DEBUG CODE
if (objectB.x < 0)
{
objectB.x = 1;
objectB.y = objectA.y - 20;
}
if (objectB.x > stage.stageWidth)
{
objectB.x = stage.stageWidth-3;
objectB.y = objectA.y - 20;
}

return newVx;
}

function boundaryBounce(objectA:MovieClip):void
{ //STAGE COLLISIONS
if(objectA.x > stage.stageWidth || objectA.x < 0)
{
objectA.vx = - objectA.vx;
}
if(ball.y > stage.stageHeight || ball.y < 0)
{
objectA.vy = -objectA.vy;

}

}

}
}
}


Project 4: Animation Nation


Check it.


It's hard to recall three interactive events in my life that touched me the most. But I'll try.

1. Going to Disneyland for the first time when I was eight years old. Never in my life up to that point had I been able to interact with so many different fun, physical, real things. Disneyland has been dumbed down a bit over the years, and I was lucky enough to have had the chance to see Tom Sayer's Island in its fully open, explorer-friendly form.

2. Playing Grand Theft Auto III for the first time. This was back in my middle school days. The PS2 had just come out and people were unsure of what GTA3 would be. I hadn't been following the game closely before its release and rented it after it came out. Love at first car jacking. Never had I played a game that offered so much freedom to the player and with such amazing humor. I quickly bought the game and for weeks my friends and I talked about nothing but GTA. "So what did you do in GTA last night?" "I hit an old lady in the face with a baseball bat."

3. Dark Brotherhood quest in ESIV Oblivion where you're locked in a house full of people you need to kill. This quest in Oblivion made me really appreciate the amount of work that goes into games that most people will overlook and never see again. The quest begins with the player entering an old manor. The owner has set up a "contest" for some acquaintances he needs to get rid of. He has told them that treasure has been hidden somewhere in the house but that nobody can leave until it's found. The player assumes the roll as one of the contestants but must kill each person. What's amazing about this quest is it can be done in literally DOZENS of ways and each one is totally different. If you make friends with someone in the house, they will be more likely to suspect someone else of a murder instead of the player. And if they're convinced they know who the murderer is, they'll attack that person. Depending on the friends or enemies you make within the house, it's different every time.

There are probably much more significant events than these but these are what came to mind.

Wednesday, April 20, 2011

Project 3: Collage Via Code


Constructor code:

package
{

import flash.display.MovieClip;
public class Main extends MovieClip
{
//Declare variable here - STEP ONE
var world:MovieClip;
var welcome:MovieClip;
var welcomeA:MovieClip;
var lazer:MovieClip;

public function Main() //constructor funcion
{
// constructor code
trace("Welcome ta Earf");

//Fill variables here - STEP TWO
world = new Earth; // Fill variable named space with new instance of Lazer
welcome = new Welcome;
welcomeA = new Welcome;
lazer = new Lazer;

// addChild to stage - STEP THREE
addChild(world);
addChild(welcomeA);
addChild(welcome);
addChild(lazer);

//Specify properties of the child - STEP FOUR
world.x = 160;
world.y = 125;
world.scaleX = .4;
world.scaleY = .4;

welcome.x = 400;
welcome.y = 350;
welcome.scaleX = .5;
welcome.scaleY = .5;

welcomeA.x = 410;
welcomeA.y = 360;
welcomeA.scaleX = .5;
welcomeA.scaleY = .5;
welcomeA.alpha = .3;

lazer.x = 400;
lazer.y = 100;
lazer.scaleX = .7;
lazer.scaleY = .7;
lazer.rotation = 30;

}

}

}


When most people see a list of game development roles, they think of how awesome it would be to be a game tester. The reality though, as many will attest to, is that it's absolute hell and one of the most tedious tasks one can perform. The thrill of playing a game that the rest of the world doesn't even know about is quickly purged by the mundane task of reporting bugs and glitches... and there are A LOT of bugs and glitches in pre-release software.

So it's clear that I definitely do not want to be a game tester. Maybe if it were for a developer like Rockstar North, but how many Imagine: Babiez and Barbie Horse Adventure titles would you need to slog through before being hired to test the next Grand Theft Auto?

The best role for me as a member of a game development team would be an artist. Specifically, 3D modeling and texturing sounds like the most interesting to me. I feel that it would be much more rewarding to see your 3D models on screen than to know the game is less glitchy because of my bug reports. I did a little bit of 3D modeling with Solid Works (a CAD program designed for mechanical engineers) and I found myself creating things totally unrelated to engineering. Guns, brass knuckles, etc.

Project 2: Collage


More to come...


It's no question that Miyamoto was and still is a legend within the game industry. What makes him unique and an excellent game designer in my opinion is his passion for fun, family-oriented games that stand up against the modern "heavyweights" like Call of Duty, Halo, Grand Theft Auto, etc. His games are proof that you don't need to shoot people to have fun. And while I and many others disagree with the some of the hardware design choices and lack of "core" titles from Nintendo, Miyamoto still manages to impress time and time again.

The article discusses Miyamoto's fascination with caves when he was young and how that translated into some of his game design. I think that's a pretty good model to follow. There are tons of elements from places I've been and experiences that I've had that could translate into a game or some aspect of a game. When I was in high school, I also wanted to create a virtual replica of the school using the Source engine. Who knows, maybe someday I still will!

Sunday, April 3, 2011

DMF 203 Symbols

Here they are!


Favorite Non-Computer Game

My favorite non-computer game is the board game Monopoly. There are a ton of really amazing board games out there today, but perhaps I can attribute my love for this game to exposure I had to it when I was really young. Almost everybody grew up playing Monopoly with their family, and I'm no exception. The rules are easy to understand, the goal is clear, and there is a lot of decision making required throughout the game. There are tons of different incarnations of Monopoly, but the original (Board Walk, Park Place, etc) is generally what comes to mind. The property names and colors along with the unique playing pieces (I'm always the car!) have become very iconic over the years.

The game I create probably won't have anything to do with Monopoly. However like in Monopoly, I will try to give it iconic elements that aren't overcomplicated and will stick in the minds of players. A Flash game should be very "pick up and play." As soon as you over-complicate it, you lose the people who would rather be playing Call of Duty.

Sunday, February 27, 2011

Final Presentation and Self-Evaluation

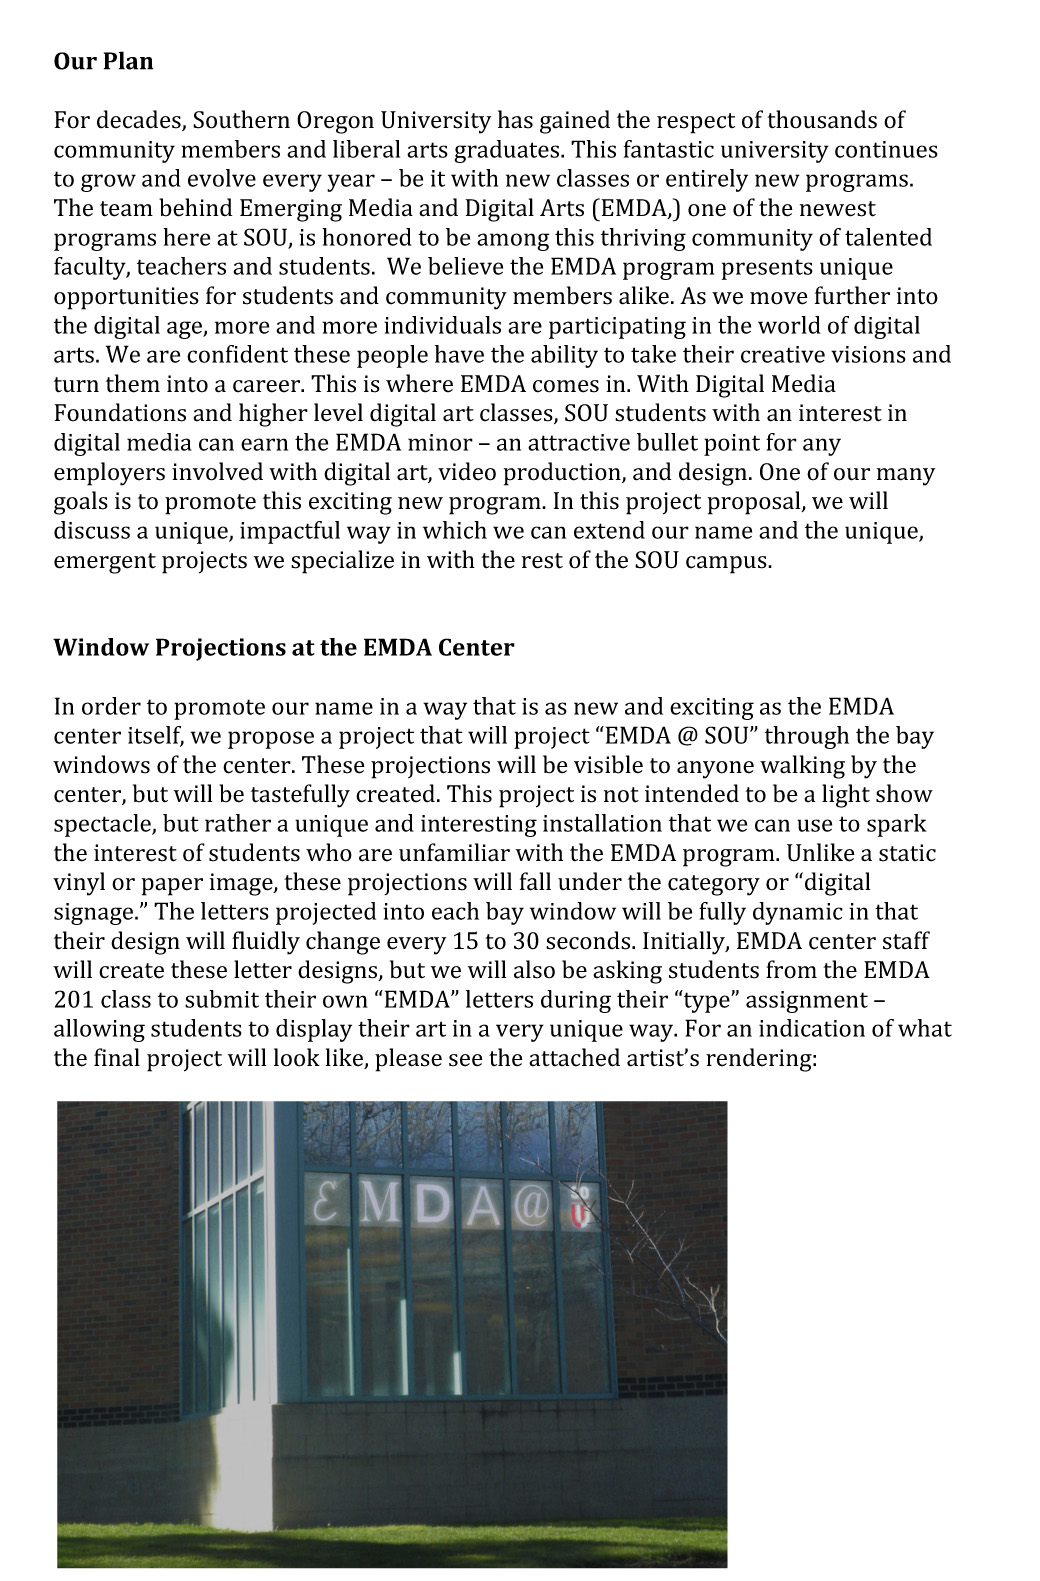
The type of project I worked on this term (and will continue to work on) is the installation of unique "digital signage" at the EMDA center. This project combines digitally produced images, the latest in projection technology, and a large, physical space to create a dynamic "EMDA @ SOU" holographic projection display visible to anyone walking by the center. Although I had originally planned to have an interactive version of the letters ready by now, I vastly underestimated the difficulty of creating a small interactive Flash program. Thankfully, I will be taking DMF 203 in the spring and will have a much better understanding of Flash. The greatest challenge for me during the course of this project has been researching and putting together a project proposal in order to obtain funding. Although we know exactly what components we need for the project to work, the proposal is only just starting to make the rounds and we may not know for a while whether or not we will receive funding. Of course, I didn't want this to stop me from working. To test our theory and to provide a proof of concept, I ordered a sample of the clear holographic projection film that we plan to use on a large scale. We won't be able to create the final dynamic video feed until we actually receive the projectors we need, so I created several simple concept looping video feeds. The first was used to show what a range randomly changing type faces would look like forming "EMDA." The second set of videos used our clear screen sample as the canvas. We borrowed a projector and and were able to project a video feed into the window with changing letters followed by the EMDA logo. As you can see by the image below, the EMDA logo shows up very brightly. It isn't as bright when viewed from a wide angle, but the impact should be very apparent when we increase the scale of the projection.


Here is a video of the short loop projected onto the sample. It's backwards because it is projected from behind the screen:


Although I was not able to accomplish everything I set out to do in one term, I worked very hard on my research and concept material. The only thing holding me back from fully completing the project is money. However, everyone so far who has seen my proposal and concepts seems to be on board and thinks it will be a very unique attraction on campus. I sincerely hope that those capable of providing funding will not only see a very cool artistic installation, but an opportunity to get students interested in the EMDA program. Thanks to everyone (especially Professor Arellano) who has helped with and supported this project and I look forward to completing it in the weeks to come!

Thursday, February 17, 2011

Project Proposal for the Higher-Ups

Here is a version of my project proposal. I will be changing a few things about it. It's different from the one we did in this class in that it's intended for those who will decide to fund or not fund this project.


Monday, February 7, 2011

Artist's Rendering


Here is a Photoshop composition that should give an idea of what my window projections could look like. I'm not expecting them to be this bright during the day, but they'll really come alive at night. Keep in mind that the letters were change to a different design either on a time scale or via some kind of input.

I would like this to fit in well with the design of the building. I don't want it to jump out at people, so to speak. That said, it will be unlike anything most people have seen on campus and will certainly get the eMDA word out there!


Friday, January 28, 2011

Gadgets for Ineractivity

Howdy y'all. I know some of you (including myself actually) are interested in ways in which we can add a bit of interactivity to our digital media projects. This doesn't have to be extremely expensive. In most cases we can take a solution meant for a practical application and mold it into something that suits our needs. Thankfully, there is a lot of open source software on the net that can help us with this.

For motion sensing, it's possible to use a standard webcam in combination with free motion sensing software. For Windows I suggested Yawcam if you're doing something very simple - http://www.yawcam.com/

Yawcam is a simple but feature-rich program that is normally used as a security tool. But what's great about it is you can specify the program to execute an .exe file or play a sound. This could potentially be used to start up program that YOU created as someone passes by. How you write that program (or which program you use) is up to you.

If you're interested in a solution that gives you a little more creative freedom, you may want to try out Zone Trigger - http://www.zonetrigger.com/interactive-digital-signage/

The interactivity features in Zone Trigger were created with interactive advertising in mind. This is an expensive program at $250 (clearly meant for commercial use) but you're allowed to use the program free for 30 days. From the Zone Trigger site:

Simply connect a camera and put motion hot spots on the video image. These hot spots are bound to scripts that will be called when motion is detected. Each spot is independent and can call a different script. Advanced features allow even more complex navigation to create interactive applications.

Wooooow.

As with Yawcam, Zone Trigger can use a standard USB webcam as its input. A good quality webcam can be found at Amazon, Newegg, or pretty much anywhere that sells computer electronics. You shouldn't need to spend more than $30 on a webcam. Here's a Logitech cam that can record in 720p and take 5mp photos for under $30:

http://www.amazon.com/Logitech-Webcam-C310-Video-Photos/dp/B003LVZO8S/ref=dp_cp_ob_pc_title_3

And if you haven't already, JOIN AMAZON STUDENT! With your SOU email you'll have free two-day shipping and $4 overnight shipping on nearly any Amazon product for a year. It's perfect for this sort of thing.

http://www.amazon.com/gp/student/signup/info


Motion sensing is not the only form of interactivity you can provide an audience. You may also want to consider the numerous amounts of voice-command software out there as well as more physical devices like a keypad. Even a Dance Dance Revolution floor pad can be used to interact with your own program. Don't like the ugly DDR pad design? Just cover it up with your own work.

http://www.amazon.com/Multi-Platform-PS-PS2-Xbox-PC-Mac/dp/9752892698/ref=sr_1_1?s=videogames&ie=UTF8&qid=1296246108&sr=1-1

You can then use a keymapping program such as Total Game Control to map the dance pad inputs into mouse or keyboard strokes. You can even map an input to an event or complex string of keyboard inputs.

http://www.digitaltransforms.com/


Hopefully this post is insightful for some. I for one will be trying out Zone Trigger for my project. See everyone on Monday!

Friday, January 21, 2011

Project Timeline

One of the biggest road blocks I find myself coming across in working with an established organization like SOU is helping others see that my idea is good enough to spend school funds on. At the moment that is by far my largest concern. I will of course go ahead with my project regardless of the school's decision to fund it, but without the school's help I'll have to settle for a one-time show sort of deal. With that in mind, here is my timeline for the term:

1/26 - Come up with an initial proposal to those who could potentially help with funding. Address common concerns as well as those which people may not consider. How much money will this project require? How do we address energy-related concerns? What is the most cost-effective projector that suits our needs? Most importantly, how will this benefit EMDA and the university as a whole?

1/31 - Hopefully have a proposal submitted to the necessary people by this day. The proposal should be of professional quality complete with digital renderings of what the final product will look like. Meanwhile, work on some of the letter designs and familiarize with Flash.

2/2 - Most letter designs should be done by this day.

2/7 - Continue working. Regularly check up on proposal status. Beg for money on the street if necessary.

2/9 - Work

2/14 - The digital work should be completed by this date. I should also know by now whether or not a permanent installation is reasonable or not. If it is, consider ways in which we can make it interactive. Happy valentines day! As always, I'll be wearing green.

2/16 - Begin installation work and testing proof of concept. Thankfully I have a small projector at home that can help with this.

2/23 - Everything should be finished by this point. Final presentation any day after this.

As for my evaluation, I will be ready for one on or after 2/7

Sunday, January 9, 2011

CAS 399/ART 450 - Project Proposal

Howdy y'all. I just arrived in Phoenix, AZ (world's largest suburban shopping center) from Dallas, TX where I was visiting family. Tomorrow I'll most likely be going to the National Championship game but in the meantime I've been thinking a bit about my project for this course. Actually, I've been thinking about it for quite some time.

I currently work as professor Arellano's assistant in the EMDA center. Part of my job there is to think about ways in which we can improve the center and the EMDA program in general. Although the center itself is in an amazing location with a fantastic view of the campus, I feel the look could be improved in a way that really shows the physical side of digital media. The EMDA center has some fantastic tall bay windows which I would like to work with in order to create something that hasn't really been done on the campus before: Interactive window projections.

During one of our class sessions, professor Arellano used window projections as one of his project examples. I have also been thinking about how cool a projected image would look in the center's windows and would like to take it a step further. The bay windows at the EMDA center come out of the building at a 45 degree or so angle. Each side contains six window columns. At the center we decided that "|E|M|D|A|@|SOU (the school logo)| would be the most appropriate thing to project. To do this we will use four small projectors - one for every three window columns.

Rather than simply project a static image, I would like to do something much more unique. Each of the "EMDA" letters will have multiple unique designs done in a way similar to the "type" project in DMF 201. I can create these images myself initially, but in the future it would be more fun for people if we used work from DMF students. These letters will change every 15 to 30 seconds randomly to a new design.

If we have the resources, I would love to add one final touch. Since the bay windows are viewable from the path that leads to the SU, I would like to have some kind of buttons or pads alongside the path. Each button would correspond to a different EMDA letter and when pressed, the letter would change to a different design instantly (and perhaps flash to a different color very briefly for more of a visual impact.)

This project is going to involve a lot of variables. I will need to determine which projectors we need, where they need to placed, and any other things one might need to know about window projections. I will then need to create a lot of different letter designs, and figure out how to create a looping yet interactive video in Adobe Flash. Even if we do not have the funds or ability to make this thing interactive, I will still try to create something interactive. If the buttons or pads can't be used outside, we could certainly do it in the center.

Anyway, that's my proposal. I think it could be a really awesome addition to the EMDA center and would be one of the most unique visuals on campus after it starts to get dark. Hope everyone had a good weekend and I'll see everyone next week. Go Ducks!

Friday, December 3, 2010

Term Project: Final Week of Production

Pages 8 and 1


Pages 2 and 7


Pages 6 and 3


Pages 4 and 5


1. The most valuable skills that I acquired this term were in relation to turning out digital creations into printed creations. Learning how to properly use Adobe InDesign was especially helpful, as was learning about which color modes to use for print and why certain tones don’t work well with printers.

2. When I created my program, I wanted to focus as much attention as possible on the characters. Or in my case, the actors in the Cabaret performance. The Cabaret is a somewhat dark setting, and my book reflects that with a dark background. On the other hand, the characters are very colorfully dressed and I wanted as much detail as possible to stand out. I felt it necessary to include the production staff and and Director’s note. For these I didn’t stray too far from the Cabaret’s original design.

3. I plan to show my program to the Cabaret and see what they think. I feel that the current show programs are not something anyone would care to take home with them. Although my program is expensive to print, I feel that it does the characters justice. The photos by Christopher Briscoe are superb, whereas the original program has no photos at all. There is no way of telling who plays who.

Monday, November 15, 2010

Term Project: Book (Week 2)

Having a bit of computer trouble at home so I'm trying to finish things up on my netbook. Not workin' out so well. :P But I was able to at least post what I got done in lab. I will post the rest soon once things are back up and running at home.


Thursday, November 4, 2010

Term Project: Book (Week 1)


For my eight page book, I will create a program for the Oregon Cabaret Theatre's production of The Wizard of Panto-Land. I'm not being payed for it (someone else is doing a simple one-piece program for the show) but I would still like to create some kind of mock-up as practice in the assumption that I may have to create something similar for them in the future. InDesign is a program I'm not very familiar with but is something I would like to learn more about as I feel it would significantly broaden my abilities.

In terms of the content I will use, the Cabaret always lends me a CD with photos of the cast taken by Christopher Briscoe. These photos are taken against a white background and are perfect for use with ads, posters, and rack cards. I've even used them to create the menu covers at the cabaret, so long as I give photo credit to Chris. For my program, I will have dozens of these photos to choose from. I was thinking of using them with text to give short biographies of the cast members (I may need to make some up) and discuss the history of the Cabaret briefly. For the history of the Cabaret, I'll need to take my own pictures. I'll do this once the Cabaret puts up my Wizard-themed OCT banner. They can't seem to decide if it's finished or not.

Thursday, October 28, 2010

Project 5: Poster

I was very enthusiastic about this project. I felt like there was an opportunity to have a lot of fun with it, which is exactly what I did. It's also why I chose to do an extra poster just for fun.

I chose to tackle all three themes for my posters. The "Dirty Moby" show poster uses a lot of composition from several photos. I changed the sky to include the (somewhat symbolic) stars along with the "stars" of the show. The performer on the stage is indeed Moby, but he was cut out from a different picture and placed there. Obviously, the same is said for the huge TV screens on the edges of the stage. I really wanted most of the attention to fall towards the center of the piece. Texts is used sparsely, though in hindsight I probably should have included some form of contact information. I used the selection and edge refinement tools a lot more in this poster than any other piece. I made some lighting adjustments to Moby's on-stage persona as well so that he fit in naturally.

The Tea Party poster is my propaganda piece. It's relatively simple, though I spent a long time making the American flag-themed skull and crossbones fit nicely and realistically on the tea cup. The text is very large (minus the "drink democratic" line) with the idea that this poster would be used at some kind of rally or protest. However, I feel that it would be just as effective if hung up somewhere as a static advertisement as well. I used red for the TEA PARTY text since it's a color often associated with something bad, poisoness, evil, republican, etc.

Finally, I chose to make fun of Justin Bieber with a movie poster. I placed Bieber in a hair salon, then prettied him up a bit with some makeup (paint brush + low opacity.) I chose a somewhat girly round font to compliment his... girliness. On the font I added a white stroke around the edges and gave it a 3D emboss effect. Since he (err she) wants to be a boy, I chose a light blue color for the font. I also added a quote from a respected critic, and found a "movie poster" font for the text at the bottom. Apparently this style of text is industry standard at this point.

I want my posters to affect my audience in a humorous way. However, the Tea Party poster is more of a serious metaphor. Some Tea Partier confronted me about it, saying I was a "Typical libber who wants to kill anyone with a different opinion." I don't think he knows what "metaphor" even means.


Bonus poster(!):

Project 4: Pictures

This project took me a little longer to complete I'm afraid. Photography isn't really my thing, but I still had fun with it! I used a little bit of composition in most of my photos to give them a different look or make part of them stand out on their own.

My "other" was Chip Kelly - head coach of the now #1 ranked (woo!) Oregon Ducks football team. My family are season ticket holders and we attend every home game. We also have season passes to the Pittman Room, which is a sort of after party where people can sit down, listen to the coach speak about the game, and answer a few questions. I didn't ask permission to take the picture of him. But since it was similar to a press conference, obviously every other person had their camera out. This is the only picture that I didn't manipulate in any way.

I feel that I learned the most from the "Alphabet Soup" part of the assignment for two reasons: For one, the lighting conditions were terrible because I was foolish enough (and late enough with the assignment) to take them at night. Even in my room with two bright lights on, nothing really compares to natural sunlight coming through the windows. I learned that you should take pictures in the day time if you want something that looks natural. With that said, the low light conditions provided some shots with a nifty stylized look. In this part of the assignment I also learned to look at every day objects in a different way in order to find symbols within them.

Me (hypothetical)


Friend (Anthony)


Stranger (Chip Kelly)


Part II

O
Q
i
B

T

Thursday, October 14, 2010

Project 3: Type

For this assignment I chose two letters at random and the other three make up my girlfriend's name (Kim.) Overall I really enjoyed this project. I have to do a lot with type in my ads for the Cabaret, and it can be extremely challenging to make type look good with the rest of the elements included in the composition. Working exclusively with type gave me a chance to be a little more creative.

I did not rasterize my letters. Instead, I chose a letter and worked with it with the restrictions of a vector object in mind. You can still manipulate vectors in a surprising number of ways.

My favorite composition is the "i" even though I didn't really do much to the letter itself. It's sort of a ripoff...err tribute to some of Valve's Team Fortress 2 ads. They too were based on Apple's iPod silhouette ads.

I tend to gravitate more towards sans-serif fonts since I feel they're a bit cleaner looking. I really admire modern, elegant, and clean looking design when it comes to ads and I feel that using serif fonts gives off a much different vibe. Both styles of type are good for different situations. Though for work in this project, sans-serif seemed like the better choice for most of my compositions.


Sunday, October 10, 2010

Project 2: Toy


You're damn right that's Samuel L Jackson. Respect the man.

Right away I knew I wanted to do something a little different with the art style. I knew I wanted to create a celebrity and Samuel L Jackson was the first person that came to mind... for some reason. I just decided to run with it.

Rather than just use solid colors to create a cartoon-like representation of this person, I chose to use a picture of him instead. This proved to be more difficult than I had first anticipated since I had to use several photo manipulation techniques in order to realistically map his face and head onto the template. I first put a cutout of his face onto the template and then used content-aware fill to fill in the area around it. Unfortunately, content-aware doesn't work well with people, so I had to use the content-aware spot healing brush to remove all the extra eyes and mouths that filled in the blank spaces. After I cleaned it up a bit, I used the rubber stamp tool to fill in the other sides, and then used some more photo composition to add an ear to each side. To create his suit, I used the paint brush tool. I also removed the fold lines on his head as they didn't seem to go well with the "realism" look.

If I were going to create a story or setting for my character, I'd probably recreate a scene from "Pulp Fiction." Though I'd have to give Sam an afro, facial hair, and a Colt 1911 first.


Project 1: Scratch

For this project, I chose to use the same colors for each image. I simply liked these colors a lot and didn't want to make something extremely bright. For the first image, I knew I wanted to do something Cabaret Theatre related. Not only because I do some graphic design work for them, but because the colors I chose match the outdoor look of the Cabaret very well. For this image I used the shape tools and perspective tool to create the building, doors, stairs, and railing. I created a stroke around the doors and then used the paint brush to make simple bushes and flowers. Finally, I included text (the same font as the Cabaret uses for their logo) on the side of the building to show what it is.

For my second picture I created cutouts from some promotional photos that I use when making Cabaret ads for the current production. My favorite tool to use in CS5 (along with content-aware fill) is the edge refinement tool. This tool allows me to cut out figures very accurately - especially when the original image is against a white background. When I cut the figures out and applied an overlay, some areas were slightly opac so I used Smart Sharpen to help make sure the entire cutouts were a solid color (with the exception of the dots on Suzanne's shirt.) To finish it off I used large text in a way that incorporates all of the colors I chose. To do this I created the text in grey, then chose a blending mode that created high contrast in the text depending on which color it was hovering over. I then flattened the image and used the paint bucket tool to change these areas of the text to colors of my choice.

For the final picture, I used the paint brush tool almost exclusively. I was going to do a more complex drawing, but considering the simplicity of the colors I used, I decided to keep the content equally simple. In the end I felt it looked like something you might see driving down the highway when you're just entering Oregon. For the text I used the pen tool to create a text path.

Before this project, I felt that I knew quite a bit about Photoshop since I've taken classes that center around it and my job requires that I use it often. However, I don't normally create these kinds of images from just five contrasting colors, so I felt enlightened in a way. In Photoshop it's always nice to do new things. I'll definitely explore this technique later on. I feel that my second image (dancers) is my favorite because I was able to use some of the tools I enjoy most and am most comfortable with.